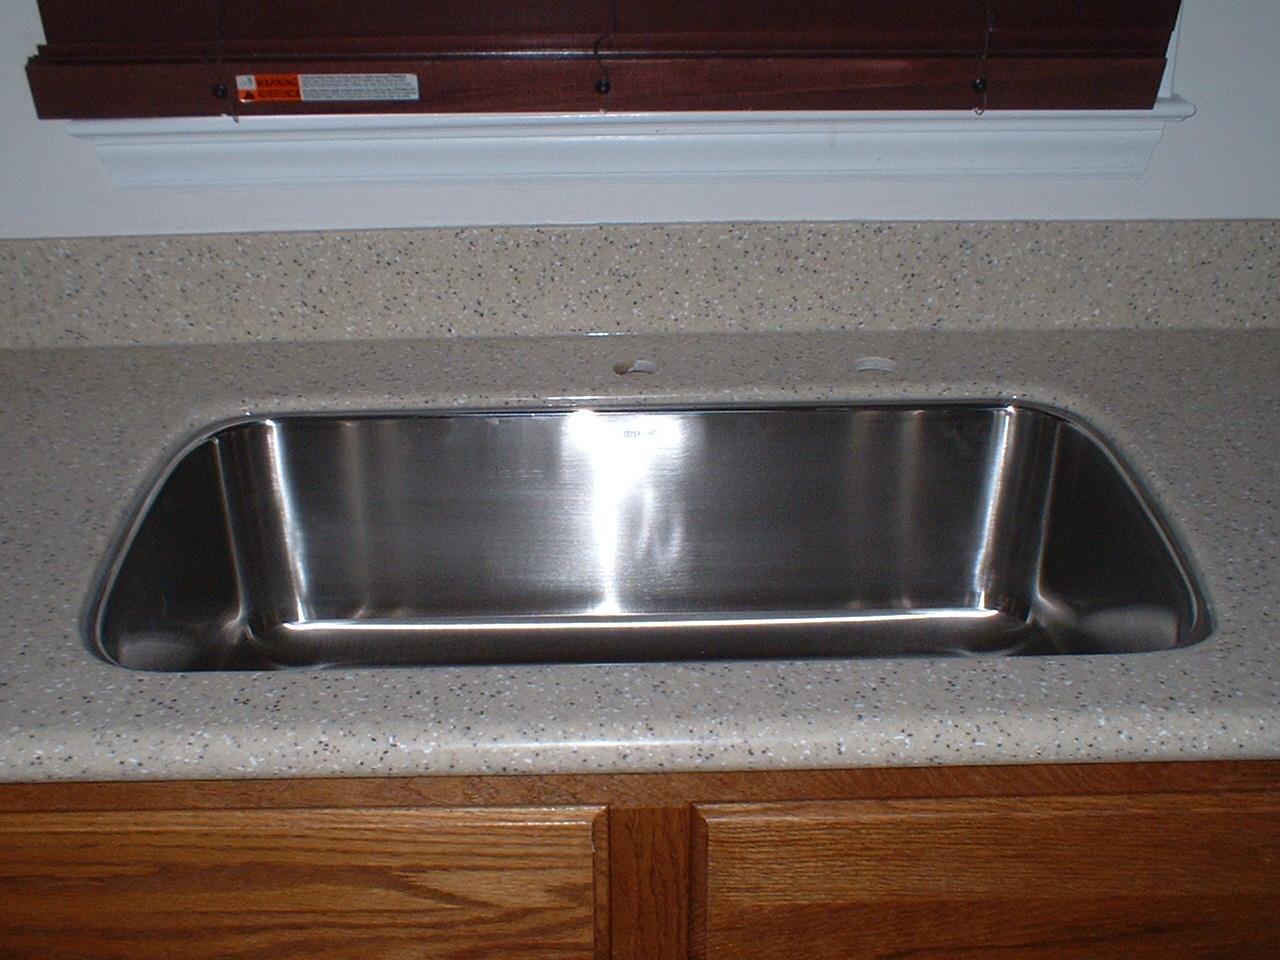
This is the finished product.

Any time you are doing a sink replacement it is a fairly big job. What makes a sink replacement job even bigger, meaning more labor intensive, is when you are changing to a different sink model than the one you started with.
In other words, if you have a sink that needs to be replaced and it is a Corian 850, it is an easier more straight forward job if you replace it with another Corian 850 bowl. Lately I have had several customers that have had one type of sink to start with and then they wanted to change to an entirely different type of sink.
Here is an example of one customer that fits that description and some details about just how tough it is to pull off a job like this one.
First, the customer had a solid surface material that they don't even make any more. It was Etura. That presented a problem in trying to find a replacement sink that was identical to what she already had. Most solid surface sinks are standard sizes of around 30"x16" or maybe even 30"x 18". There are many models and manufacturers and some are a little bigger or smaller than what I just mentioned but most are in that ballpark.
Etura, during their short lifespan, decided to make their sinks be out of the normal spectrum of measurements that are used. I think it was 32"x 18". That means that we would have to shrink the hole to accomodate a new solid surface sink from a different manufacturer.
Normally, I would just jump in there, shrink the hole, install the new sink, enjoy the customers glee for a little while and then hit the road. Of course that could not happen on this one because as I said, they no longer make Etura so getting any material to shrink the hole with was impossible.
There are about 5 gazillion different sinks that would work if we were going to just opt for a drop in sink in it's place. Naturally though, the customer always had an undermount sink and she absolutely did not want a drop in sink, most of my customers think the same. If they have had a drop in sink before they will do everything in their power not to have one again. They just love the undermount sinks for their ease of use and the smooth transition from the countertop down into the sink with no "crumb catching" lip sticking up through the countertop.
We had to search long and hard for an undermount sink that would not only be large enough to take up the oversize hole that would be there after we removed the old sink, but it also had to be able to fit into her sink cabinet base. I spent countless amounts of time searching online and in catalogs looking to find something that would work but always ran into some type of problem. Color, size, material or style. There just always was something that disqualified each type of sink that we came up with.
Finally, I contacted a company you may have heard of called
Ferguson inc. I was dealing with the Winston Salem, NC location 336-759-0253. I talked to Latonya Peeples and told her all of the hurdles that we faced in our project. After several rounds of phone tag and emails, Latonya sent me an email with a sink that she thought might just fit the bill. The sink was a Blanco granite composite model 513-441. I got with my customer and she loved the sink style and color, and I was happy because the dimensions were going to make it possible for me to complete this job and give the homeowner exactly what she wanted. I probably would have never found the right sink if it wasn't for Latonya's help. I had looked all over the internet and found several that were similar but just not what we needed. Thanks Latonya.
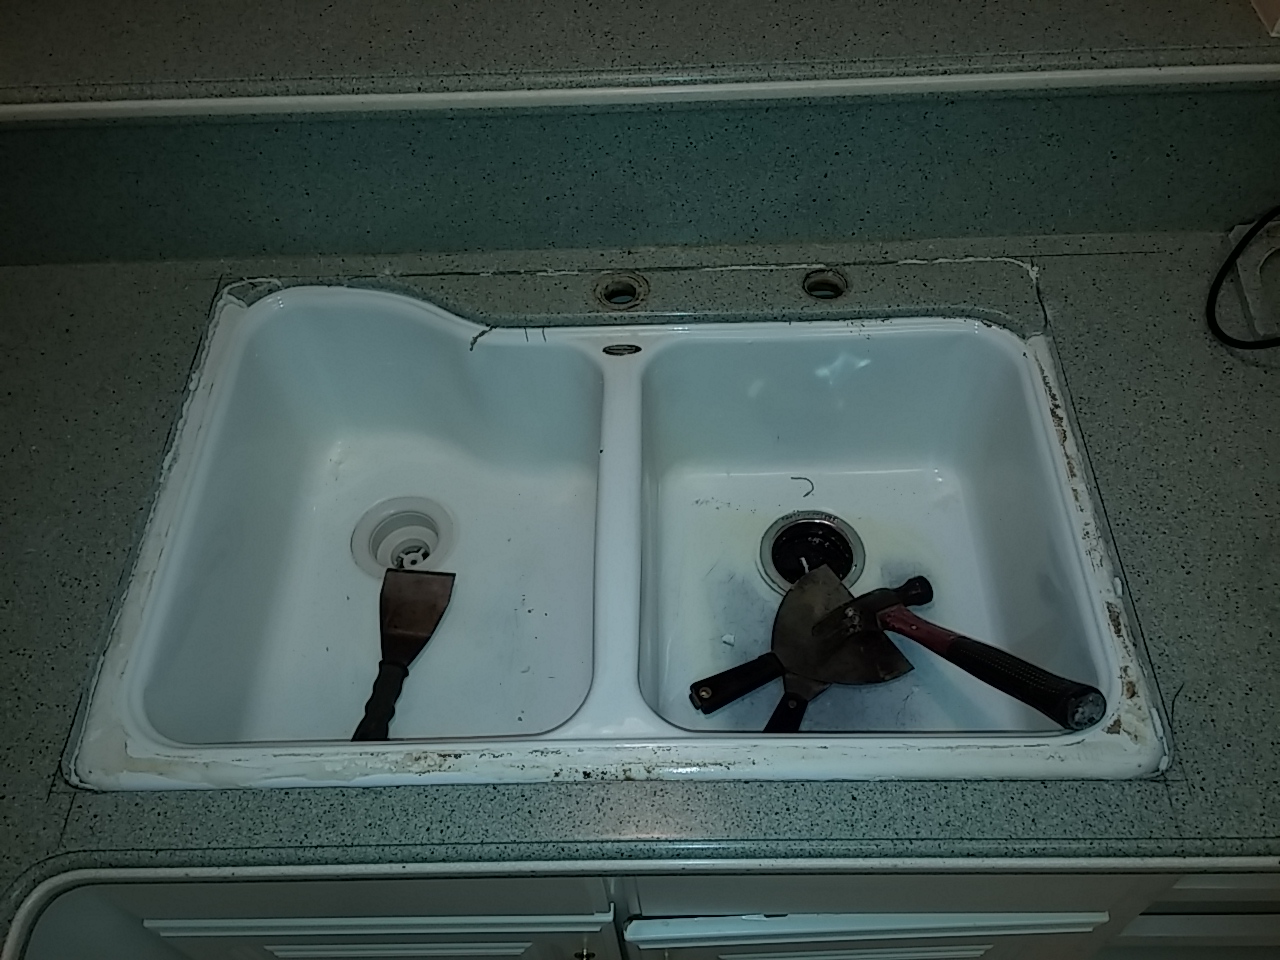
This is the sink that she needed to replace.

The sink cracked and it was leaking to the point where she could not use it. She had looked around to find someone to repair the sink for her. What you see here is the "repair". Someone showed up to smear some nasty goo on the crack and then called it "fixed". AHHHH! That is not fixed! That's just ugly goo smeared on a crack. Then, they even made her pay for it!

This particular type of sink replacement calls for a lot more job site preparation than many other types do. As you can see, all of the plumbing has been removed from the sink and the cabinets have been cleared out.

Next, I lay out my lines for cutting out the opening of the new sink. In many cases I would just cut out the deck while the old sink is still attached. In this case though, I have to first cut the existing sink free from the countertop and then cut my countertop deck to the correct dimension fo the new sink.

I have to put up a lot of plastic and then get in there with a dust mask and vacuum equipment. Dustless equipment does not collect dust very well for the types of things I will be doing so I have to take every measure possible to contain the dust for my customer.

I have cut the sink free from the countertop here. Now I need to wrestle it out of the cabinet and start working on making the new cutout to accomodate the new undermount sink.


I made a template for this cutout instead of just trying to cut to the lines by hand. It is faster and more accurate with less finish work to do.

This is the finished cutout.

This was a very long work day and after many hours of working I kind of let the whole photo documentary fall by the way so I could get the job done. Some of the things that the pictures did not show you are as follows.
1. Once I got the old sink out of the cabinet, I had to cut out the cabinet wall on the left side of the sink. That was the only way to make room for the new sink to be put into the proper place.
2. I also had to cut out a "scoop" in the cabinet wall on the right side of the sink so the sink could be wiggled into position. I only needed about another 1 1/2" which is good because the dishwasher is there and we only could gain about 2" extra. That was pretty close.
3. I had to make an elaborate support system to hold the new granite composite undermount sink in place.
4. Once the sink was installed and all of the plumbing was reconnected I then had to replace the cabinet wall that I had to cut out on the left.
If you look closely you may notice that the sink is not exactly centered in the cabinet. That is because the original sink was not centered in the cabinet. Since the holes for the plumbing were already drilled into the countertop and there was no material available to allow me to "move" any of the holes, I had to work off of the center hole that was already there. (That note is for you eagle eyed craftsmen out there that would have spotted that in the picture!)
It was a major job and a very long day but that is what makes you feel like you've accompolished something substantial. I was happy with it and most importantly, the homeowner was happy with it and has been more than happy to pass my name around to others interested in having some out of the ordinary things done to their countertops.
This is the finished product.
Another job by
Complete Solid Surface Refinishing in beautiful North Carolina.
Nationwide Surface RepairFREE quotes on life, home, auto, and health insurance!